


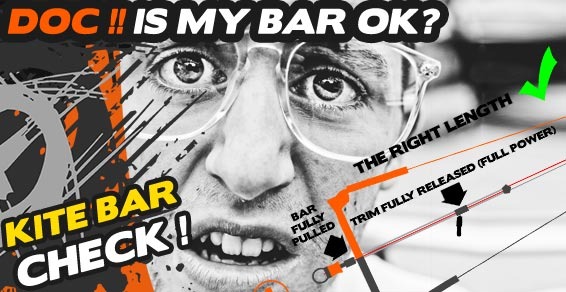


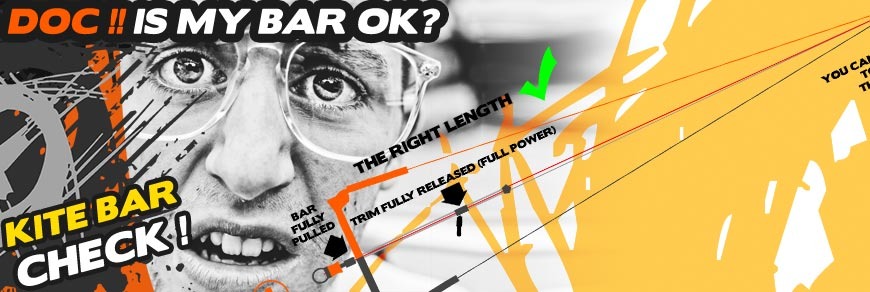
Does your kite bar need a Check?
In this article we will concentrate on checking the lines and possible adjustments. We won't go into wear and tear as this is a complex subject and if in doubt it's safest to have your bar checked in a local shop or workshop.
So if your kite doesn't behave as it did on the first day and, for example, it tends to pivot excessively or drop to the bottom of the wind window in an abnormal way, without any action on your part, it may be that the lines on your kite bar are no longer well adjusted.
If this is the case, how do you check that your lines are properly adjusted on your kiteboarding bar so that you can decide what action to take?
First of all, why does a bad configuration appear?
When you buy a new bar, it's usually tested and adjusted. Each pair of lines on the bar is of identical length and generally pre-stretched to prevent them stretching prematurely during use. Despite this, the lines must retain a certain elasticity and may lengthen over time to a greater or lesser extent depending on the level of practice. If you do a lot of jumps and kiteloops, you've probably already experienced this.
Another reason may be poor adjustment of the back lines at the level of the bar floaters. Often there are several adjustment knots for the lines at this level. We'll come back to this point later.
The different cases by checking the lines on your kite bar, and what to do then
We've produced a series of diagrams to show you how to check the length of your lines. Broadly speaking, there are 4 possible scenarios:
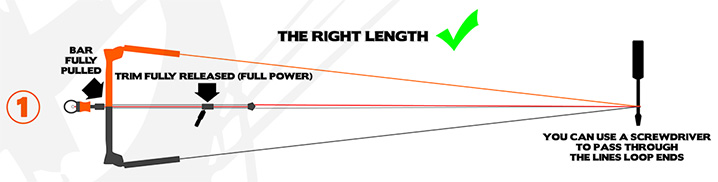
1- First possibility, everything is ok and your kite flies without any problem. In figure 1 below we see that all the lines are at the right length in a very precise configuration:
- The Trim must be completely released so that the front lines are at their maximum length.
- The bar then comes into contact with the Quick Release. The bar is perpendicular to the front lines.
You can use a screwdriver or snap hook to hook the ends of the lines together and tension the assembly.
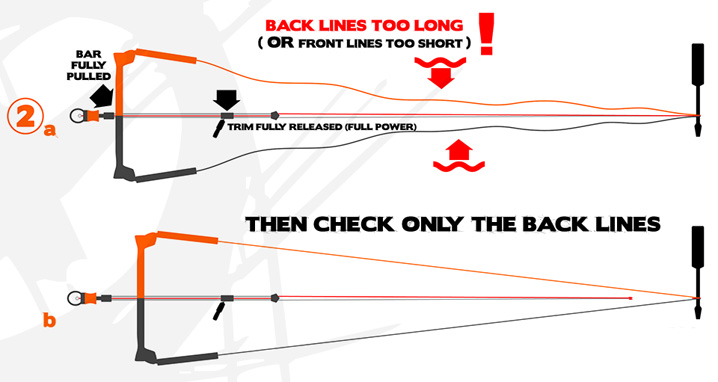
2- In diagram 2a we can see that the 2 rear lines are longer and do not tension with the rest. As a first step, we can check whether the front lines are the same length. If they are, then as in diagram 2b, check the back lines alone:
- If the two back lines are of different lengths, refer to point 4.
- If the two rear lines are the same length, then in principle an adjustment is possible.
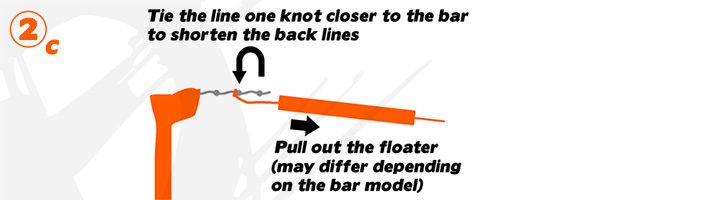
If the back lines are a little too long, the wing will not be able to be tucked in sufficiently and will lack power. To solve this problem, simply shorten the tails at the bar as shown in diagram 2c. It is also possible to adjust the overall length of the steering lines and thus the performance level of your kite to the knots that are on the kite. However, the key here is to make the correct adjustment on the bar.
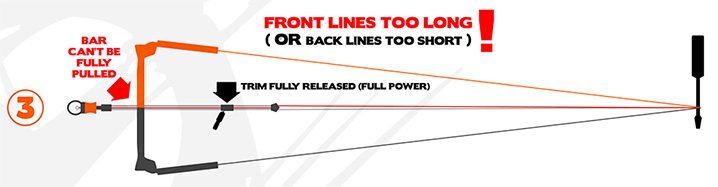
3- In diagram 3, the front lines are too long because the bar does not come into contact with the Quick Release. In this case you will probably have to tension the front lines by pulling at the Quick Release in addition to pulling the bar.
- If only one of the lines is too long, this will quickly become apparent as all the lines can be tensioned in this way. In this case refer to point 4.
- If the two front lines are longer (and the same length) you can also solve the problem by extending the rear lines. Using the same principle as diagram 2c, you can move the back lines one knot further away from the helm. This will make the back lines longer and compensate for the difference with the front lines.
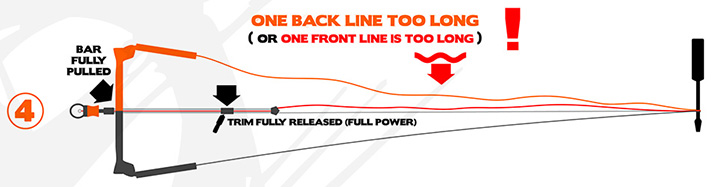
4- Finally, diagram 4 shows the case where one line (front or back) is too long in relation to the whole. If only one line is longer than the others, it often means that the kite often turns to the same side, e.g. when kitelooping.
In this case, there are several possible solutions:
- Up to 4-5 cm difference, the kite's behaviour will still be “fairly” stable by compensating a little at the controls. If it's a back line, you can also try to compensate for the difference by using the knots shown in diagram 2c. Note, however, that in order to work, the whole set up will have to match with figure 1.
- If the gap is more than 5cm, we advise you to change the pair of lines or at least have your bar checked in a shop to confirm this. A line that has already lengthened considerably loses elasticity and this will reduce its performance and durability.
- A frequently used trick is also to stretch the shorter line to compensate for the gap. To do this, all you have to do is tighten the line by grasping the loop at the end of the line with a screwdriver. This will stretch the line to the extent as long as it is still elastic.
We hope this article on how to check the lines on your kiteboarding bar will help. Don't hesitate to come to the shop with your bar if you need help.


